Access Windows Live Hotmail through POP3
You might be aware that Windows Live Hotmail POP3 access is now available to most of the countries including Pakistan and India. Alas, IMAP is still a question. Anyway, better late than never.
So now you don't need to purchase a PRO subscription to get your Live Hotmail emails in Outlook, Thunderbird or any other email client including mobile devices.
Just set up the POP3 settings as mentioned below and you should be all set
POP server:
pop3.live.com (Port 995)
POP SSL required?
Yes
User name:
Your Windows Live ID, for example yourname@live. com
Password:
The password you use to sign in to Hotmail or Windows Live
SMTP server:
smtp.live.com (Port 25 or 587)
Authentication required? Yes (this matches your POP username and password)
TLS/SSL required?
Yes
By enabling POP3 access Windows Live Hotmail has opened to its users a little bit without charging a subscription fees. Not sure why it takes so much time for Microsoft to enable these useful features. Noticeably, Hotmail is way behind GMail and AOL in enabling POP3 access. GMail and AOL have POP3 and IMAP both since the very beginning. Yahoo! - don't even talk about it. They have POP3 access to its UK users but not for US users.
sourc: Windows tricks, Windows Secrets, Hotmail trick, Windows mail trick, user windows mail on Outlook express, use hotmail on MS Outlook
Saturday, February 28, 2009
Monday, September 8, 2008
'CON' Folder

'CON' Folder
Myth - "Not being able to name a file or folder 'CON' is a bug or a secret"
Reality - "Several special file names are reserved by the system and cannot be used for files or folders: CON, AUX, COM1, COM2, COM3, COM4, LPT1, LPT2, LPT3, PRN, NUL. This goes back to DOS 1.0 which didn't support subdirectories, lowercase, or filenames longer than 8.3. 'CON' is a reserved word from the old DOS days, simply meaning 'console'. If you wanted to create a new text file in DOS you could type 'copy con newfile.txt' meaning copy from the console to newfile.txt. This would let you type some lines and when you ended the file you would have a file called newfile.txt containing whatever you wrote in the console. Since they are still relied on with things like batch files (redirect to >NUL) they are still reserved today."
Sunday, September 7, 2008
How to: change the start button text on Windows XP
How to: change the start button text on Windows XP
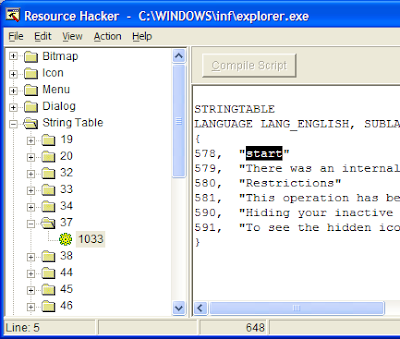
When you’ve found and opened explorer in RH, navigate to String Table -> 37 -> 1033. The “start” value is on line 4, after the 578. Change the text “start” to anything you want, making sure you keep the quotes. In this example. I changed the text to secrets-windows.blogspot.com.
Tired of the boring old “start” button at the bottom left corner of your Windows XP’s monitor? Want something new to replace iit? Well here’s how to change it.
With a few modifications in the Windows Registry, you can replace the “start” text with anything you like. Great for achieving a new, custom look for your Windows XP. So let’s get started.
Warning: this tutorial is more for advanced users, and I'm not
responsible if your system gets messed up. Only attempt the following
at your own risk.
Step 1: Modify explorer.exe
If the warning didn’t scare you enough, then the title of this step probably did. Yes, we are going to change Explorer, the backbone of your Windows XP, but don’t worry. Everything should be safe as long as you follow the steps closely.
As explorer is a binary file, we need a special tool to modify it. One of the best ones for this purpose is Resource Hacker. There are of course others that will get the trick done, but we will be using RH this tutorial so I recommend installing it to avoid making mistakes. Install it and let’s continue.
As always before changing anything. you want to back up. So open My Computer and navigate to and look for explorer. Copy paste it to a safe location on your hard drive.
Now that you’ve backed it up, fire up Resource Hacker and find the same explorer.exe.

When you’ve found and opened explorer in RH, navigate to String Table -> 37 -> 1033. The “start” value is on line 4, after the 578. Change the text “start” to anything you want, making sure you keep the quotes. In this example. I changed the text to secrets-windows.blogspot.com.
Press the Compile Script button to make Resource Hacker put together the code. Now click File and Save the script as explorer.exe. into C: \WINDOWS\inf or another C: \WINDOWS subfolder.
Note: make sure you choose Save AS, NOT just save!!
And that’s all for the first step! Now let’s move onto the second one -modifying the registry.
Step 2: changing the registry.
By now, you have a modified explorer sitting in the /inf/ subfolder, so we need to tell Windows to use that one, instead of the original one still resting untouched.
To do this, we need to make just one simple registry modification. To open up the registry, press start (something else soon ![]() ) -> run and type regedit.
) -> run and type regedit.
In the registry editor window that opens, navigate to HKEY_LOCAL_MACHINE\ SOFTWARE\Microsoft\ Windows NT\ CurrentVersion\ Winlogon and look for the registry entry “shell”. Click it.
Change the explorer.exe to inf/explorer.exe or whereever you saved the modified explorer.
And believe it or not, you’re done! All you have to do now is reboot or log out to see the changes. Enjoy your new custom Windows XP start button!
Subscribe to:
Posts (Atom)


